Phone Controlled Robot Arm
I am working on an Arduino robot arm that is controlled by an Android app of my design using MIT App Inventor.
| Engineer | School | Area of Interest | Grade |
|---|---|---|---|
| Atheeshwaran D. | Carlmont High School | Computer Science | Rising Senior |
Final Project

Demo Night

Conclusion
Throughout this program, I have learned a lot about engineering, including exploring the electrical and mechanical aspects of engineering. In the beginning, while I had a strong programming background in Java and Python, I had no idea about what Arduino, ESP32, servos, and ultrasonic sensors were. Now, I can confidently say that I understand some of the electrical components and the programming. By using the Arduino IDE for my project, I have become proficient in programming in C++ as well. As someone who aspires to be a computer science engineer, going through the process of building a robot arm has better equipped me to be an active problem solver and address complications I may encounter. My experience here at BlueStamp has been very enjoyable and instrumental, considering the many challenges I overcame. From this wonderful experience, I learned that with patience and persistence, I can accomplish the builds and projects of my dreams.
Third Milestone + Modifications
My third milestone was optimizing my code and the controls on App Inventor to gain complete control of the robot arm. Some changes that I made include adjusting the min and max values on the sliders in the App Inventor to cover the range of motion of the servo motors and decreasing the delay in my code for smooth movement of the robot arm.

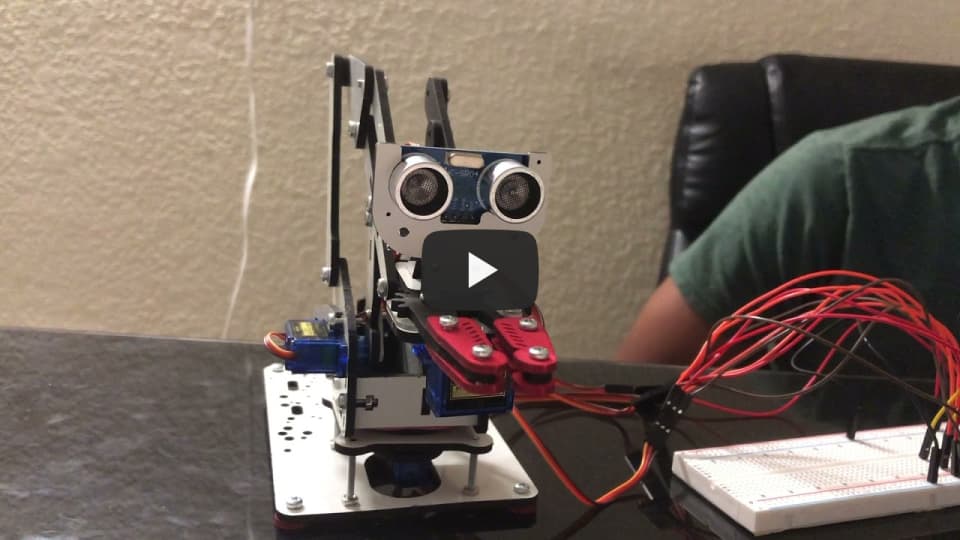
For my modifications, I attached an HC-SR04 Ultrasonic Sensor and a LED light. In my project, if the ultrasonic sensor detects an object within 10 cm, the LED light shines brightly, and the robot arm picks up the object, turns it, and drops the object. Otherwise, if the ultrasonic sensor detects an object more than 10 cm away, the LED light will glow less bright. One crucial learning moment during this milestone was learning about the ultrasonic sensor and how it works. The ultrasonic sensor detects an object a certain distance away using a technique similar to echolocation. The ultrasonic sensor emits ultrasonic waves that reflect off an object, and the sensor converts the reflected sound into an electrical signal. Math can be used to calculate the distance of an object from the ultrasonic sensor. Since distance = speed • time, we need to find speed and time to calculate distance. Time is the total time taken by the sound waves from the transmitter to the object and back to the sensor’s receiver or the entire duration divided by 2. Additionally, we know that the speed of sound in dry air at 20 °C is 343 meters/second. However, we need time in microseconds because that is the ultrasonic sensor’s received value. By converting seconds to microseconds, we get that the speed of sound is 0.0343 centimeters/microseconds, meaning we can now calculate the distance by multiplying 0.0343 to time/2. Below I have attached an image of my setup and my fully functional code.


Second Milestone
My second milestone was receiving input data from my phone using the Bluetooth provided by the ESP32. The ESP32 is a microcontroller with integrated Wi-Fi and dual-mode Bluetooth, making it a better alternative to the Arduino Uno board that I previously used in my first milestone. With the ESP32, I set up a connection between a Bluetooth serial terminal app on my phone and the serial monitor on my computer. Using an example code, I sent and received String text from the app on my phone. I then implemented this same logic to my program controlling the robot arm. However, one challenge that I faced in my own code was that the String text was not displaying in the serial monitor or would display an integer that I did not input. After researching and seeking advice from my instructors, I discovered that the serial monitor received ASCII integer values of the text I sent from my phone. To resolve this problem, I used advanced type casting by first casting the ASCII values to char and storing the characters in a char array and then concatenating each element of the char array into a String variable. By doing this, I was able to successfully receive input data from my phone.

My second milestone was also making a mobile app using the MIT App Inventor. I created a list picker as my connect button when building my app to choose the ESB32 from a list of available Bluetooth devices. Additionally, I used the vertical table arrangement in the app inventor to create a column of sliders, each controlling one of the four servo motors. Lastly, I picked colors of my preference that matched a navy blue/grey color scheme to really make my design come alive.

Below are the code blocks behind how my app functions. The left set of blocks are all for Bluetooth connectivity, including what happens before and after clicking connect or disconnect and what happens if there is an error while connecting. Equally important, the right set of blocks all concern the input sent to the serial monitor when moving the sliders that control the servos. Each slider sends a servo number (1 through 4) and an angle up to 180 degrees to the serial monitor, which then rotates the specified servo to the given position.

First Milestone

My first milestone was assembling my robot arm and controlling it from my computer. To accomplish this, I first got two servo motors working using a breadboard, and I programmed the Arduino to rotate the servos to a certain degree taking input from my computer using a serial monitor. I got the servos to work by connecting the servo control signal line or the orange wire in my project to one of the digital PWM pins on the Arduino and the servo power and ground to the power and ground on the Arduino. One of my key learning moments was learning about PWN or Pulse Width Modulation. PWM Control allows a digital signal to replicate an analog voltage. However, with an digital pin, I would have only been able to control on or off, whereas with a PWM pin, I could rotate the servos to a certain position. Then, I built the robot arm from the base to the head and claw of the arm. Finally, I got two more servos working and connected the four servos to the robot arm. By controlling the servo motors, I was able to control the robot arm from my computer.